
Rumored to be one of the most feared and dreaded tasks, replacing the broken power antenna in my Giuargio Esprit was starting to become a bothersome legend in my mind - so much so that I decided one day to just jump into and tackle the issue head on. I started by purchasing a new original Lotus Esprit antenna from the guys at JAE, Lotus part #A082M6271F.
I came across a very useful piece of instructional information written by one of the members of the Golden Gate Lotus Club describing his replacement procedure and used it as a rough guide.
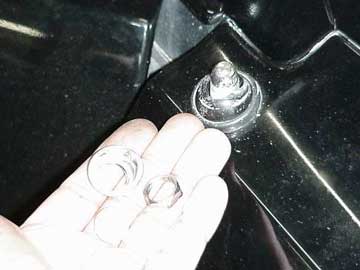
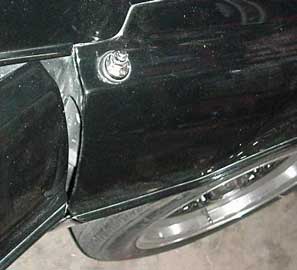
To start, you first need make sure that the antenna is in the "down" position - otherwise it will be next to impossible to remove the old unit; cutting off the antenna is a viable option if the unit is stuck in the "up" position. Unscrew the lock-nut, washer and angle piece that hold the antenna in place at the top of front passenger quarter panel as shown below.
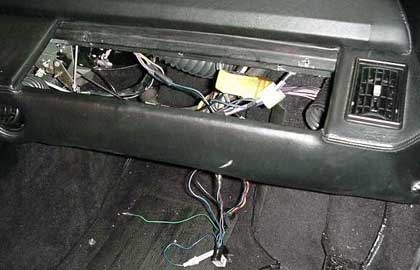
Next, remove the glove box door and glove box; this will give you the necessary room in which to remove and install the new antenna, as well as access the wiring necessary for connection. Simply remove all the screws, nuts and bolts that hold the glove box in.
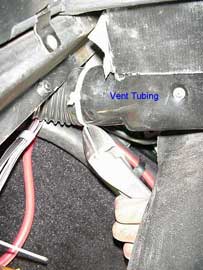
Disconnect the passenger-side air vent hose that connects to the air vent by snipping the tie-strap and pulling off the vent tubing. This will allow the exposure of the antenna once the wheel arch cover is removed. This view is from the glove box area.
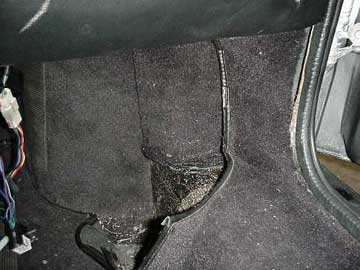
Inside the passenger footwell area at the base of the front wheel arch, peel away the carpeting just enough to expose the bottom and the right side of the wheel arch cover.
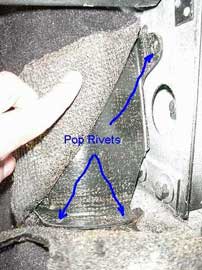
There will be a series of pop-rivets holding this cover in place; two on the bottom, and one on the right side. Remove them by drilling them out. Self tapping screws will be used to replace these rivets upon re-installation.
The cover should now easily slide out.
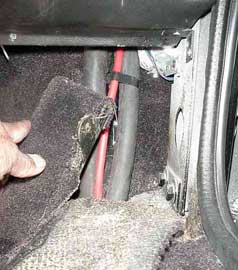
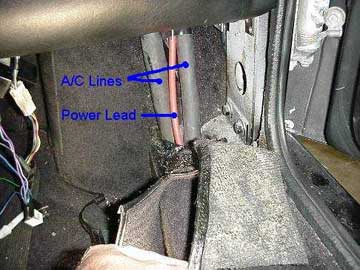
With the wheel arch cover removed, you will see a series of A/C hoses and red power lead running up along side the front wheel compartment. The antenna will be located up and to the right of these hoses.
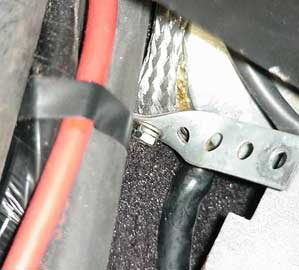
By viewing the compartment area from the side (as though your head is where your passenger's feet would be), you will see the mounting strap and the base of the antenna that it holds in place. Unscrew the nut that holds the strap to the antenna and begin wiggling the base of the antenna to loosen it.
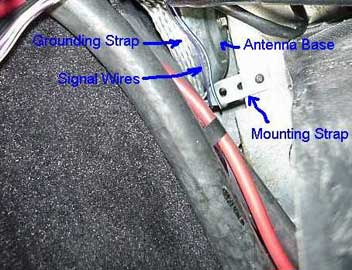
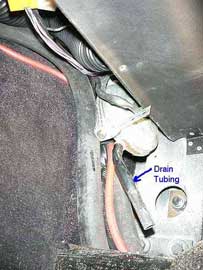
As you continue to wiggle the antenna out, it helps to have a helper lightly guide and push the tip of the antenna downward at the same time. Position the A/C hoses off to the side to aid in the antenna removal. Snake the signal and power cables outwards to allow for more slack as you pull the antenna unit out further. The black drain hose connected to the bottom of the unit will start to come into view.


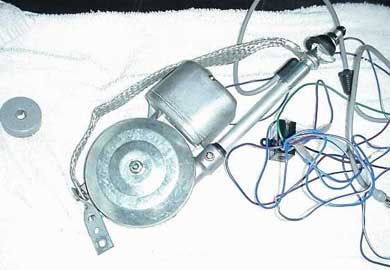
The old antenna should now be fully exposed; carefully note how the wires are run through the dashboard and how they are connected to the old unit. Also note how the grounding braid attaches from the top of the antenna to the bottom of the unit.
Visually compare the new antenna to the old one to make sure they are the same. Start setting up the new antenna connections to match the old antenna's signal and power wiring, ground braid, and drain hose. This would now be the perfect time to test the new antenna's functionality by powering up the radio; be careful to allow the mast room to extend sideways out the passenger door when doing this as the mast comes out fast.

Wiggle the new antenna into place and guide the top of the mast through the quarter panel mast hole. Screw down the mounting hardware and nut from the top, and reconnect the mounting strap to the unit underneath. Position the black hose downwards for proper draining, and test the antenna with the radio again to make sure all connections are intact.
Re-install the wheel arch cover with self tapping screws (carefully making sure not to puncture the A/C lines or power cable) and glue back the carpet to finish.
The finished job looks good as new.
Verdict
This guide was copied onto LEW from an owners site (http://home.att.net/~fcmprod/esprit/antennareplacement.html) and we take no credit for it. We've reproduced it here as it's such a good guide to doing this work, we'd hate the chance we might lose it if the owners site was removed for any reason.
As for the guide, it shows you one of the more difficult jobs in detail. Hopefully it will be useful to many owners. More info on Aerials can be found here.
This guide was performed by Curly on his 1986 Turbo
If you have any comments, feel free to e-mail us at admin@lotusespritworld.com
Comments
January 2008
Love the sight, but I feel the piece on aerial replacement is wrong.I have an 88 Stevens, and of course the aerial went neither up nor down. I took it out and connected it up to battery on the bench. It still did not function correctly.To cut a long story short, I discarded the braided earth strap. I then made and earth connected directly to the earth on the relay box. I re-installed connecting my new earth lead directly to bottom support bracket. No problems, same aerial, it has worked fine ever since. (I don't believe the original ex-factory earth is up to it)
Roger Harris
![]()
|
|