
Replacing Giugiaro Fuel Pump
by Robin Williams
After more than five years of being unused and sitting on the bottom of the car in the back of a barn, having covered just 300 miles my Fuel Pump decided it was time to give up the ghost. Naturally it chose to do so in the most public location possible to maximise embarassment!The symptoms were erratic (mis)firing and eventually it would not rev when put under load and finally it just wouldn't start up at all.
Checks:
The first check was for the Whirring sound when the electrics are turned on. Normallly you can hear an electric motor sound before you try to start the car. This had stopped.
Next thing to check was the Fuel Cutout switch in the boot by the Battery. There is a trip switch with a long red 'stalk' (which should only be visible if it has tripped out)
Then there were the Fuse(s) - Mine were in the glovebox
With the electrics turned on, the chap from the AA tried tapping the pump with the back of a screwdriver to see if it was jammed and if this would shock it back into motion.
The last tell tale sign that the pump was truly history was that it was very warm to the touch. (Often an indicator of a dead electric motor)
Installation
This is a fairly easiest job you attempt on your Esprit. Should only take a couple of hours.
Before starting work there are a few points of safety to note.
Firstly, remember - you are about to open up the Fuel System. This involves opening the pipe coming directly from the petrol tanks and the feed to the fuel filter / carbs - so take all precautions you can think of to ensure that nothing can spark and that noone decides that now would be a good time for a cigarette!
The next step before starting is to Disconnect the Battery in the boot, to ensure that none of the wiring you are about to cut can spark. This required a 13mm Spanner on my car.
|
You will need the following parts: Bosch Electrical Fuel Pump |
You will need the following tools: Trolley
Jack |
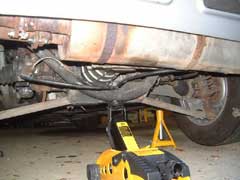
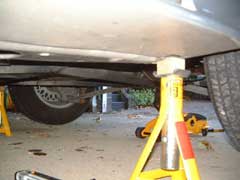
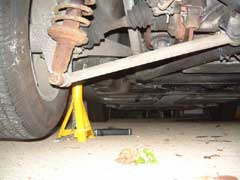
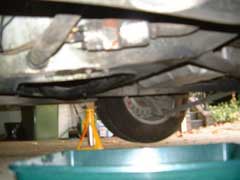
So all saftey points taken care of, jack the car up onto axle stands. I placed the trolley jack in the middle at the back on part of the chassis (left). I then placed the axle stands under the "official" jacking points using small wooden blocks between the stands and the car itself (middle). The Fuel Pump is situated underneath the LEFT hand side of the car just in front of the rear wheel - Roughly in line with the decal. (right)
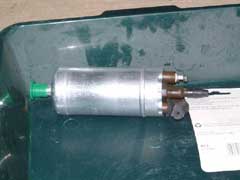
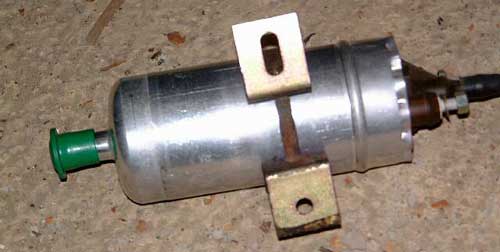
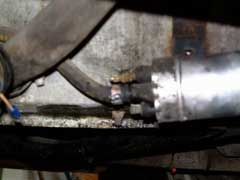
In this picture it is just above the torch you can see lying on the floor (left). The replacement pump was a Standard Bosch part, replacing an OEM Lucas part. Dont be tempted to take the rubber caps of the new pump when you get it – one of them will not go back on properly and these can be *very* useful for reducing waste and spill when attaching the fuel pipes (middle). The green cap is the input side (the larger hose FROM the fuel tanks) on the right you can see (from top to botom) One of the electrical terminals (with a washer and nut) then in the middle, the Output pipe with its' black rubber cap and at the bottom the other terminal with the rubber boot over it.
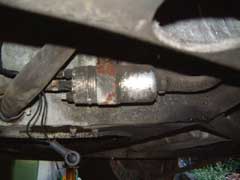
As I didn't have any mole grips to clamp off the fuel hoses, I decided to do as much as I could *before* starting to remove any of the fuel pipes. This involved replacing the push on type electrical spade connectors with screw on ones, unbolting the pump from the body of the car and removing the bracket which clamps the Fuel Pump to the body (right). Here you can see the fuel pump with one spade connector already removed. The (grimy) silver cylinder is the Fuel Pump. The large hose on the right is the feed FROM the petrol tanks. The rather rusty looking band in the middle is the bracket holding the pump to the body. On the left is the output pipe (heading off to the fuel filter) and the two electrical connections. You can see the bottom one has been removed already and the spade connector is exposed.

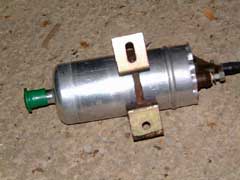
Make sure to take note of which wires are which - there will be a Live and Ground. On mine, there were two ground wires (black) and one Live (Brown) Get these the wrong way around and the pump will try to push the fuel back into the tanks! You also need to pay heed to the two new connectors which are of different sizes - The Live (+ / brown) was M4 and the ground (- / black) was M5 It is also shown on the pump itself (left). I used a pair of snips to cut the "push on" spade connectors off. Cut as close to the original connector as possible - you want to keep as much length in the wires as you can. There were a pair of rubber boots supplied with the new pump which must be pushed onto the wires before crimping on the new "screw on" connectors. I made the mistake of stripping the end of the wire first which made it harder to push the wire through the end of the rubber boot. So, AFTER you have pushed the boots on, strip all the wires.
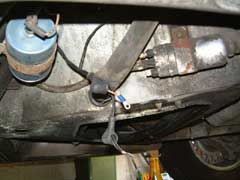
The new connectors were quite difficult to attach to the wires as I didn't have a proper "crimp tool" so I was having to use a pair of pliers and good old fashioned brute force! They did have a tendency to come off unless *really* attached so I shall have these replaced when I next take the car to someone with the appropriate tools. In this picture both the connectors have been changed to the "screw on" types with the rubber boots fitted (middle). On the left the blueish cynlinder is the fuel filter. You can see the output pipe from the left of the PUMP snaking around the back of the "fuel tank balance pipe" and into the far end of the filter.
So, new connectors fitted the next thing to do was to free the pump from the metal bracket that clamps it to the body. This was quite awkward - you are upside down under the car - and as I couldn't get a socket in there, involved using a pair of long nosed pliers to hold the nut in place while using a 10mm spanner to undo the bolt. Completely remove the nut and bolt. (Don't Lose the Washer!)
Then you need to remove the bracket from the body of the car. This was fairly straight forward and needed a 10mm spanner. There were two bolts in all, top and bottom. Again, dont lose the washers! Make a note which way around it was as the bracket has a "Hole" and a "Slot" and these are matched on a rubber base between the bracket and the body.
Having completely removed the nut and bolt from the bracket, you will now be able to slide it along the length of the pump and remove it.
Beneath the bracket there was also a rubber protector that was easily missed as it was so covered in muck. It was very thin and was used to protect the pump body from the bracket. Very carefully roll the edges of the rubber back and forth, until it frees and it should then readily slide off the end of the old pump - I pushed it off the Supply hose end and up along the supply pipe right to the top end next to the body, where it would stay out of the way for now.
Okay now it all starts to get a bit scarey!
Next is to start to remove the clamps that hold the fuel hoses in place. The input pipe used a regular Jubilee clip which just unscrewed (Flat Blade) but dont undo this yet as it leaks very readily! Just unscrew it and re-tighten it - just to make sure it is free and moving. The output pipe used a very annoying crimp on type of clamp which was a nightmare to remove. I needed to use a pair of snips and long nose pliers to open it up enough to be able to move it (right Blurry!). This took me a good 20+ minutes and a large amount of bad language. I eventually replaced this clamp with a 10mm Jubilee clip. (Open it up a fair amount now - before you need to use it)
Ok, here comes the speed round!
First things first, get some kind of bucket or tray to place under the pump / hose area (left). Unfortunately pictures are not available for obvious reasons!
I did it in this order. Loosen the Jubilee clip on the input hose just enough but not so much that it starts leaking badly. Take the black rubber cap off the output end of the new pump. Remove the output hose and place your thumb over the output from the old fuel pump to stop the tanks emptying!
The hose to / from the petrol filter will leak a bit but only a limited amount as there isn't much petrol in this end of the system. Grab the new 10mm Jubilee clip and place it over the hose then take the new filter and get the hose onto the end with the electrical terminals. (This all has to be done one handed as the other is still holding the end of the old pump, keeping the petrol in!) There should be enough stiffness in the output pipe to do this without too much difficulty. It stayed in position on mine wthout having to do up the new jubilee clip, so I could DO this at the end and move on quicker for now.
Now completely undo the Jubilee clip holding the supply hose to the old pump and take the hose off. Get your thumb over the end of the pipe as quickly as you can. It WILL spill petrol at a fair rate but not at such a pressure that you can't easily hold it. I only had just under a quarter if a tank of fuel so maybe a fuller tank will exert more pressure? Some more fuel may spill from the pump but not a great deal.
You can now place the old pump on the floor and connect the supply hose to the new pump The hoses will have a 'natural position' they will want to be in and the pump will need to be in a prticular place against the body. With both these things in mind, rotate the pump on the pipes so that once bolted into place, you will easily be able to do up the nuts on the electrical terminals. Tighten both the jubilee clips.
That's the worst bit over. Be VERY AWARE that there is petrol around the area and in the tray and remember to observe all necessary precautions. Move the rubber protecting strip back down the hose and onto the fuel pump into roughly the place where the bracket will go. Slide the bracket onto the new pump and line it and the rubber protector up to the place they will need to be to clamp the pump onto the body of the car. This is a bit fiddly you may need to open the bracket up slightly. Remember the bracket has a "Hole" and a "Slot" and needs to be oriented correctly to attach to the rubber base / body (middle). Offer the bracket and pump up to the body of the car and replace the two bolts and washers.
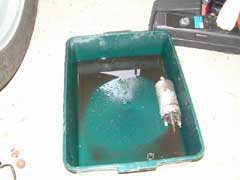
Now you can tighten the bracket onto the pump itself - Dont forget the washer that goes under the nut. Everything is now in place and all that remains is to bolt the two electrical connectors onto the pump. They are keyed by size so will only go on the right way (assuming you wired them correctly!) This is quite awkward as access is rather limited. Tidy everything away, make sure the whole area is dry and free from petrol. Move the tray containing any spillage completely away from the area. As you can see, luckily, there wasn't very much (right).
Reconnect the battery. Turn the electrics on and listen for the tell tale whirring. If all is well, swtich off, jack the car back up, remove the axle stands and lower the car down to the floor. Let it whirr for 10 seconds to charge the system a bit and then start her up and hope for the best! Much to my surprise, it started first time. It will run very roughly for a good thirty seconds while the carbs and the rest of the system gets any air out of it. Go out for a 'test drive' ;) and enjoy!
LEW's Verdict
Total time about 2 hours. I am a complete novice and it would have been quicker if I had a proper crimp tool for the electrical connectors and had mole grips or clamps for the hoses (though be careful not to crush them). Also the clamp on the output hose wasted a LOT of time. One consolation is that anyone with a working pump can be certain it will never disconnect by accident!
CONCLUSION
A fairly easy job to cut your teeth on. Nothing particularly complicated
but does require care and an eye for safety. The car runs better than before
as obviously the pump was on its' way out...
![]()
This mod was performed by Robin on his 1986 Turbo
Info direct from Lotus Cars Ltd
The original Lotus Pump was A082L6014F
This was a Lucas Pump – Lucas Part Number FDB704
There are lots of Bosch Pumps that are very similar and do the job.
Some have different electrical terminals etc. but ok to use.
Lotus never used the Bosch Pump
The Lucas Part Number also x references to an Intermotor 31522.
The Lotus (Lucas FDB704) Fuel Pump is also use on some models of Jaguar XJS.
Might help tracking the Bosch unit down
If you try this, feel free to e-mail me with your Verdict at kato@lotusespritworld.com
|
|