Esprit Suspension
Removing and fitting
by Jonathan Edwards
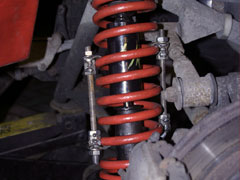
The Esprit front suspension is made up of a standard coil over damper unit, it is fixed at the top to the chassis and at the bottom to the lower wishbone with the upper wishbone fitting around the unit. The procedure for removing the shock absorber is fairly straight forward but will require some time and patience, it's advisable to read through this guide in its entirety before trying to do the job. On my 1st attempt it took me well over a day to get one side off - now I can change one in under an hour because of the shortcuts outlined in this guide.
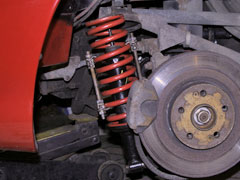
The Esprit rear suspension is made up of a standard coil over damper unit, it is fixed at the top to the chassis and at the bottom to the rear wheel hub / radius arm. The job of replacing the rear shock absorber is fairly simply however the damper upper fixing to the chassis has very limited space to work on as can be seen from the photos. Ensure the threads of the dampers are spotless and totally clean, use of lubricating oil is also recommended, this will give you the ability to wind the nuts on with greater ease using different tools if the need arises.
Think always - Safety First.
When working on the car, especially the suspension where axle stands are usually placed, think carefully about what you are doing. By removing the spring of the suspension you are effectively removing the thing that holds the car up in the air. ALWAYS support the chassis or have safety stops there to catch the car if it falls down off the jack. When ever possible do not get under the car at all, keep your head out of the wheel arch and be sure in your mind what you are doing is safe.This job is difficult unless you've had practice and can take you a full day.
You will need the following parts:
New suspension (or whatever you are fitting)
You will need the following tools:
Suitable jack to lift the front and/or rear of the Esprit
Safety support (can be an axle stand),
Wheel nut spinner to take the front wheel off,
Selection of 13mm 17mm and 19mm sockets and spanners (depending what you have to hand)
Large hefty screwdriver
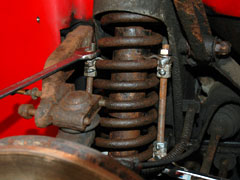
Front Suspension Removal
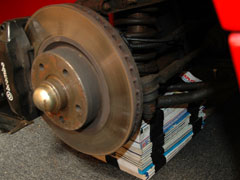
Start by positioning the car on a level surface, chock the rear wheels and apply the hand brake so the car doesn't move when jacking it up - Slacken the wheel nuts off 1/2 a turn and jack the car up as shown in the LEW guide elsewhere on this site. Remove the front wheel, before you do anything else you must put your safety support in place - I use paper packing to support my car because it has a large area to support on and will not collapse. I packed the underside of the lower wishbone out so if the car fell off the jack it wouldn't go very far, you won't be working underneath the car anyways so it should be quite safe, I also packed the chassis directly inboard from the lower wishbone fixing for when I would be taking the spring off - now the car is 100% safe.
Next step is to part the upper wishbone which wraps around the front shock absorber, the wishbones are the swinging arms from the chassis to the wheel hub. The upper wishbone is special not only because it splits but also because there are 2 adjusting shim sets on it, if your car is as rusty as mine you might struggle to see them and lose one which wont be helpful.First set is the castor shim plates, which sit either side of the wheel hub upper ball joint. You'll need to take not of how many shim plates are fore and aft of the ball joint before slackening the 2 bolts that secure the the upper wishbone. By slackening off the bolts the shim plates can be carefully removed and placed somewhere safe, now you can completely withdraw the bolt that is closest to you.
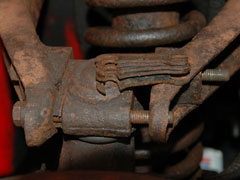

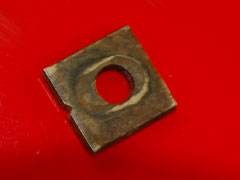
The other shims are the camber angle plates, these are on the back bolt and site into a recess on each half of the upper wishbone. These plates can sometimes fall out so you need to be wary of them, they fit back into the recess with the little 'Vee' cut out facing outwards towards the wheel. These are critical - if you lose one or put them back wrong the car's front wheel camber setting can come out of specification which will affect cornering grip.
Withdraw the back bolt out so that one half of the upper wishbone is free, you'll need to slacken off the upper wishbone to chassis bolt very slightly so that you can swing the upper wishbones up and out of the way later on, for the time being swing one half upwards so you have more room to work around the shock absorber, the other half of the upper wishbone should have at least 1 bolt in it supporting the wheel hub / disc. Do keep in mind if this bolt falls out the whole hub is free to fall down, this isn't so bad but it will be hanging on the brake line which isn't exactly ideal - ensure the bolt is secure with a nut so the hub / disc stays in place but is easily movable.
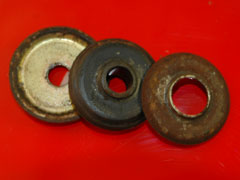
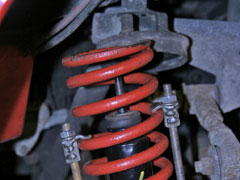
Now remove the nut(s) that secure the damper to the chassis, by doing this you will also free the upper suspension bush which issandwiched in-between 2 metal plates - take this off and ensure the assembly is kept in the correct order, compress the damper down thought the chassis as low as it can go. Now remove the bolt holding the damper onto the lower wishbone, the damper cannot move anywhere as it resides in a recess and is quite safe.
Now comes the fun part.
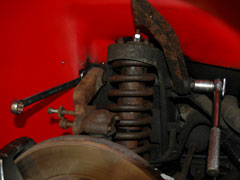
The front springs are extremely strong and unlike the rears will require a fair amount of compression. You can do this one of 2 ways...1) Compress the spring using spring compressors - these have to be heavy duty as the tension they will be under will bend smaller threads no problem, you also might need 2 sets to compress the spring enough as it's quite a small space to work in.
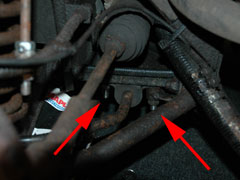
2) Remove the front anti roll bar - this is the option I go for and it allows you to force the suspension (wishbone) down a lot further which means you don't have to compress the spring so much. To remove the anti-roll bar from the chassis simply remove the 2 bolts holding it on which are located under the steering arm gaiter - you can do all 4 (2 on each side) which makes it even easier. If you're doing both suspension sides this method is quicker.
I use the jack and the weight of the car to help me compress the spring - whilst doing this always ensure the car is supported correctly.At this point ENSURE the car is still supported either on the chassis or the body where shown in the jacking description, by taking the spring off the car will not be supported on the front axle / wishbone anymore. If you haven't positioned supports correctly the car WILL FALL and cause damage / injury - take the time to think about what you're doing and always think safety first.
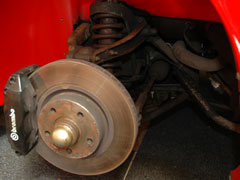
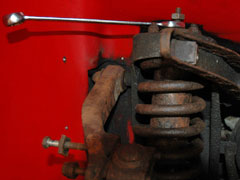
Using the big hefty screwdriver try prizing the spring down against the upper cup of the chassis - after some compressing of the spring you will be able to force the spring out, away and towards you. Once out of the upper cup on the chassis you can remove the bolt holding the remaining half of the upper wishbone to the wheel ball joint - with 1 hand support the hub, with the other remove the spring. The damper should now come out easily, if not then the easy way is to get it off is to put the upper fixing to the chassis back on and lift the car on the jack so that the weight of the hub / wishbone etc pulls the damper out - be ready to support the hub as it drops free.
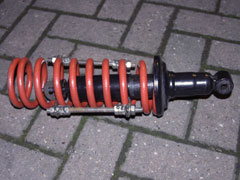
The damper and spring are now off.
Front Suspension Fitting
Refitting is the opposite of removal. Remember to re-tighten the chassis-to-upper wishbone fixing that was slackened so that the arms could swing easily. I would fully advise having the geometry checked and the bolts correctly torqued after changing the suspension to ensure the car is at it's factory setting - incorrect geometry can lead to loss of grip, handling issues and uneven / excessive tyre wear.Rear Suspension Removal
Ensure the car is on a flat and level surface, you will need to chock the front wheels fore and aft to prevent the car from rolling in either direction. Loosen the wheel nuts by 1⁄2 a turn and jack the car up as shown elsewhere on the LEW site, I would recommend using the chassis jacking point in the middle of the car just below the gearbox as this will lift the car up evenly and allow you to do both shock absorbers in one go.
Once the rear wheel is free to spin you can remove it – once removed immediately place packing or similar under the car to prevent it falling down if the jack fails. I always use paper packing under the rear body jacking point, don't use the rear axle for obvious reasons!
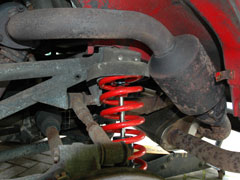
One side is slightly different to the other because of the exhaust pipe / catalytic converter that runs above the chassis upper cup. On my car there is a heat shield between the wheel and the exhaust to remove and a cover over the damper to chassis fixing cup itself, this needs to be removed in order to get at the upper fixing nuts, this is a simple job to do.
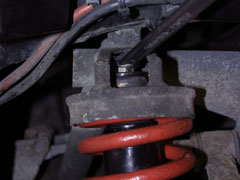
I started by applying the spring compressors, this takes the pressure off the top fixing nuts so they can be taken off with relative ease. Loosening the nuts that secure the top fixing of the damper on the chassis – In my case there are 2 nuts here which require a 17mm spanner, a small socket is ideal but due to the very limited space you might find it will not fit properly. Once the nuts are off you can remove the upper bushing and cover plates, ensure you remember which order they came off in to prevent damaging the rubber when putting it all back together.

On the lower damper fixing slacken the large nylock nut that holds the damper onto the wheel hub using a 19mm socket / spanner, this allows some movement on the damper but will prevent it from falling off when you remove the spring. Ensure the spring is compressed enough and then force the damper shaft down thought the chassis mount and to its lowest setting, now you remove the large nylock nut holding the damper on and the whole lot can be removed.
Rear Suspension Fitting
Refitting is the reverse of removal, again the hardest part is the upper damper fixing to the chassis.Two things to note are wiggling the damper around when it is in place ensures the bushes locate properly which will give you more threads to play with when putting the nut back on. Also keeping the spring compressors on until the last minute will take any pressure off the damper body which should make the job of fitting the nuts much easier.
LEW's Verdict
This guide was supplied by a LEW regular, so we haven't actually done the work ourselves. But, we have removed and fitted a damper on the rear of our Esprit, which wasn't particularly difficult. This sort of job can easily be done by a home mechanic, but you'll stil need to get the set-up checked to make sure the wheels and suspension are still aligned correctly.
This guide should be very useful to any owner who has a leaky damper or sagging old springs, who is just replacing old and worn parts. This short of job will cost you between £150-£250 depending on where you go. So it will make a good saving to those capable of doing the work.
This mod was performed by Jonathan Edwards on his 1998 Esprit GT3.
If you have any comments, feel free to e-mail us at admin@lotusespritworld.com
![]()
Updates
Way out of date though - when I done mine last I used a whole new set of techniques, it's just the way it happens, the more you do it the more ways you can think of improving things.
Use it as a basic guide, the Esprit suspsension really isnt that hard at all - main thing is setting it up correctly.From personal experience I would whole heartedly recomend putting the spring height platform of the dampers to the lowest section.
When setting up put the car under load (I plan on using 2 ballasts of 80KG each on each seat and 1/2 tank of fuel which is what the good book says) then tighten the bolts up.
Again I did this wrong last time and tightened things up when it was on the Kerb weight not the mid-laden weight of the car.Like most things on the Esprit - fitting and the basics are simple, it's the small additional items that are often overlooked / not made clear that can cause problems.
100% recomend a garage manual for the car if you service it yourself - so many useful bits and tips in there.
Jonathan Edwards
Just my 2 cents worth.
Once you have done the set up it will look like the car is riding very high and it will be off by probably 20-25mm.
This is just because everything needs to bed in.
This takes a couple of weeks to settle before you will get to the normal ride height.rgds
Adrian
Hello, I just wanted to add my experience with Bilstein/Eibach to my GT3. In three words I would say "floating while cruising". I used the middle position from 3 and the car is just too high. Maybe crossing the channel during a winter windy day with canoe, is more stable than my car at 250Km/h...
I have to remove them to use the lower position. But allthough I have the V8's tires, there is a distanse up to 3'' between tire and wheel arch... I onder how am I going to lower this! These springs( i believe the height depends on them mostly) must be very hard. Actually I would bet that they are for other car and not Esprit. I 've purchased them from SJSportsCars which I trust, and Steve said: "All of the suspension bolts should be tightened with the weight on the suspension. ensure this was done or slacken them all go for a short drive at very slow speeds to settle the suspension, then load the car as if there were to people in it and tighten the bolts." Any suggestions?minos
That was my next course of action
In all honesty it's easier said than done with the car on the deck (easier with a drive on set of ramps) - you only need to slacken the main bolts that are on the main bushes, I'd be tempted not to go for a drive though, load it up passenger wise and roll the car back and forth a few meters and or depress the front / back of the car manually to ensure the suspension is settled.
Jonathan Edwards
Hi,
Just finished changing dampers on my '88 esprit turbo to the new factory bilsteins. I read and followed the factory manual, but took copies of your site for the procedure. Your site has always been very helpful but in this instance, at least ,with my car, the way that is proposed is the hard way by far.
It isn't necessary to compress the front springs in the car at all. Leave the strut intact (you may nead to back off the top nut slightly ,that compresses the top bushing to get it thru the hole in the chassis). I did remove the antisway bar so you can push the lower wishbone down. Then the whole thing pops out easily, don't even need to pry it out.
I didn't take pictures, but the manual is right . You may want to revisit this procedure on your site.
Once again, great site,
Have a good one!
Al Braun
|
|