Replacing Cam Shaft O Rings
I took my car in to a local garage where I trusted the guy to have a look at my clutch slave cylinder. Upon doing this he noticed some oil
around the cylinder head gasket area and assumed my gasket had gone.This was viewed from looking through the passenger side rear wheel arch. Obviously this worried me immensely. Thankfully a phone call to Peter at PNM put my heart at rest by saying that oil would not be visible were this situation the case. More than likely it was the O-rings at the end of the cam that needed replacing as this is a common fault. Peter supplied me with 2 replacement rubber O-rings at a cost of around £3. The fitment of these appear to have stopped the leak.
Below are step-by-step instructions on how I removed the old ones and fitted the new ones.
This work shouldn't take more that 4 hours depending on how capable you are:
You will need the following parts:
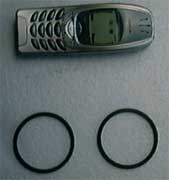
O rings
You will need the following tools:
Jack
Wheel chocks
Axle stands
19mm socket
13mm spanner (ratchet spanner would be ideal)
10mm spanner (ratchet spanner would be ideal)
Hammer
Screwdriver
WD40
Mole wrench
Rags
Pencil and paper
Stanley knife
1. Replacement O-rings
2. Jack car up by U-shaped piece of chassis below gearbox.
3. Place vehicle onto axel stands as shown on other LEW pages
4. Using 19mm socket, remove rear passenger side wheel
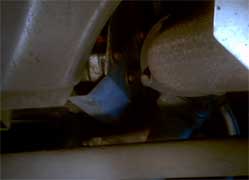
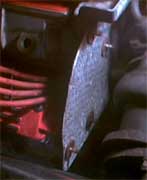
5. Remove stainless steel heat shield from in between turbo charger and engine block.This requires undoing 4 10mm nuts – 2 at the top and 2 at the bottom. The top 2 on mine were in good condition but the bottom 2 were very rusty so I had to spray WD40 onto them. Each nut has a split washer and a large washer between it and the heat shield. I can’t remember which were easier undone from the wheel arch, the back bottom one I think as the turbo is in the way when accessing from the top.
View from top of engine
View from wheel arch
6. Remove the heat shied. I found I had to pass it down through the suspension arms and remove it from the wheel arch.
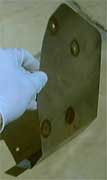
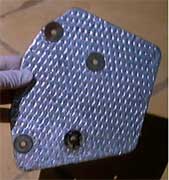
7. Remove the ‘asbestos’ looking heat shield. Each bolt has 2 large washers in between this heat shield and the stainless steel heat shield. This can be removed from the top of the engine bay.
8. Remove the spacers that remain on the bolts. This is where a pencil and paper is handy as there are 2 different sizes and must go back in the correct location. The top 2 on mine came off very easily but the bottom 2 I had to wriggle off with the help of WD40 and a mole wrench.9. If you have a charge cooler, you need to remove the charge cooler vibration mount. If not, you can jump straight to step 12.
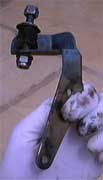
10. Undo the 13mm nuts at the top and bottom of the bracket. Both nuts have a washer and the bottom one also retains a wire. Notice the different nuts top and bottom.
11. I don’t know if there is a proper way of removing the bracket from the two bolts going into the block, but I found there was enough give in the rubber suppression block to bend and twist the bracket off these.
Chargecooler bracket in situ
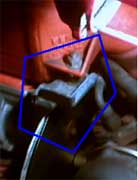
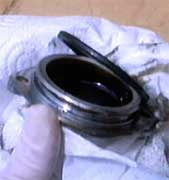
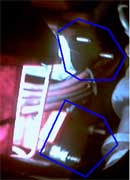
The bolt doesn’t go all the way through the rubber block; there are 2 bolts which allows it to bend about the middle12. Remove the caps at the end of the cam shaft. These are force fitted into place so just require some gentle persuasion to remove them. I found that gently tapping them with a hammer and screwdriver slowly pushed them out. On one side, they have a slight lip that the screwdriver or similar object can be pushed up against. I had to lie under the car to remove the lower of the 2 caps as the exposed lip is underneath.
You will need some rag at this point as you may find oil spills out of here when you remove the ends. Rag was sufficient as my car had been standing for 3 hours or so, so the amount of oil in the cam was minimal.
Poor photo showing 2 cam end caps (You can see the spacers on the bolts on the bottom one)13. Remove the cap completely and remove the old O-ring. I found a Stanley knife helped with this.
14. I found my cap had a bit of gunge on it so I took the opportunity to remove all that.15. Place new O-ring in place of old one. I don’t know if oil should be placed on the O-ring or the contact surface between the cap and engine block. As it is there to prevent oil loss, I assumed that it should remain dry and clean.
16. Place cap back into end of block and tap all the way home with a hammer. When I removed mine and oil came flooding out, I pushed it back in whilst I went in search of some rag. Doing this allowed me to feel the difference in effort required to push the new O-ring into the engine as compared to the old O-ring – the new one was a much tighter fit which must be a good sign.
17. Replace chargecooler bracket (or go to step 20). This was much easier than I though it was going to be. I placed top of bracket where it should be (ie: top and bottom bolts sticking through their correct holes). Locate bottom hole first then manoeuvre bracket so that top hole locates. Push back against block.
18. Replace and tighten top washer and nut (remember different nut types)
19. Replace wire on bottom bolt, replace and tighten washer and nut
20. Replace spacers (refer to diagram to make sure correct spacers and correct number of spacers go back onto correct bolts)
21. Replace ‘asbestos’ look-a-like heat shield
22. Replace 2 washers on each bolt between the 2 heat shields
23. Replace stainless steel heat shield
24. Replace washer and split washer on each bolt
25. Replace and tighten 10mm nuts on each bolt
26. Replace wheel and finger tighten wheel nuts
27. Remove axle stands
28. Lower vehicle
29. Torque wheel nuts to 75ft lbs
LEW's Verdict
This job was not difficult to do. Out of the other jobs we have done, we would say it is harder than replacing the EBPV but easier than replacing the clutch slave cylinder. Access and corrosion are the only things that are going to get in your way. The bolts on the bottom of the heat shield were tricky to get at and we ended up impersonating a yoyo as we first tried to get at them from the top and them from underneath. A rachet ring spanner really would make this job easy. Also, removing the end of the cam on the lower cam was tricky as we had to lie underneath the car. Please do make sure you note which spacer comes from which bolt as they are different and do need to go back in the same place.
This mod was supplied and performed by Jason Kite on his 1989 SE
If you have any comments, feel free to e-mail us with at admin@lotusespritworld.com
![]()
|
|